Our final bathroom renovation project to share with you today: the primary bathroom! Our most ambitious project and my favorite to date. Find more details (and some insane before images) after the jump…

A Peaceful Primary Bathroom Renovation
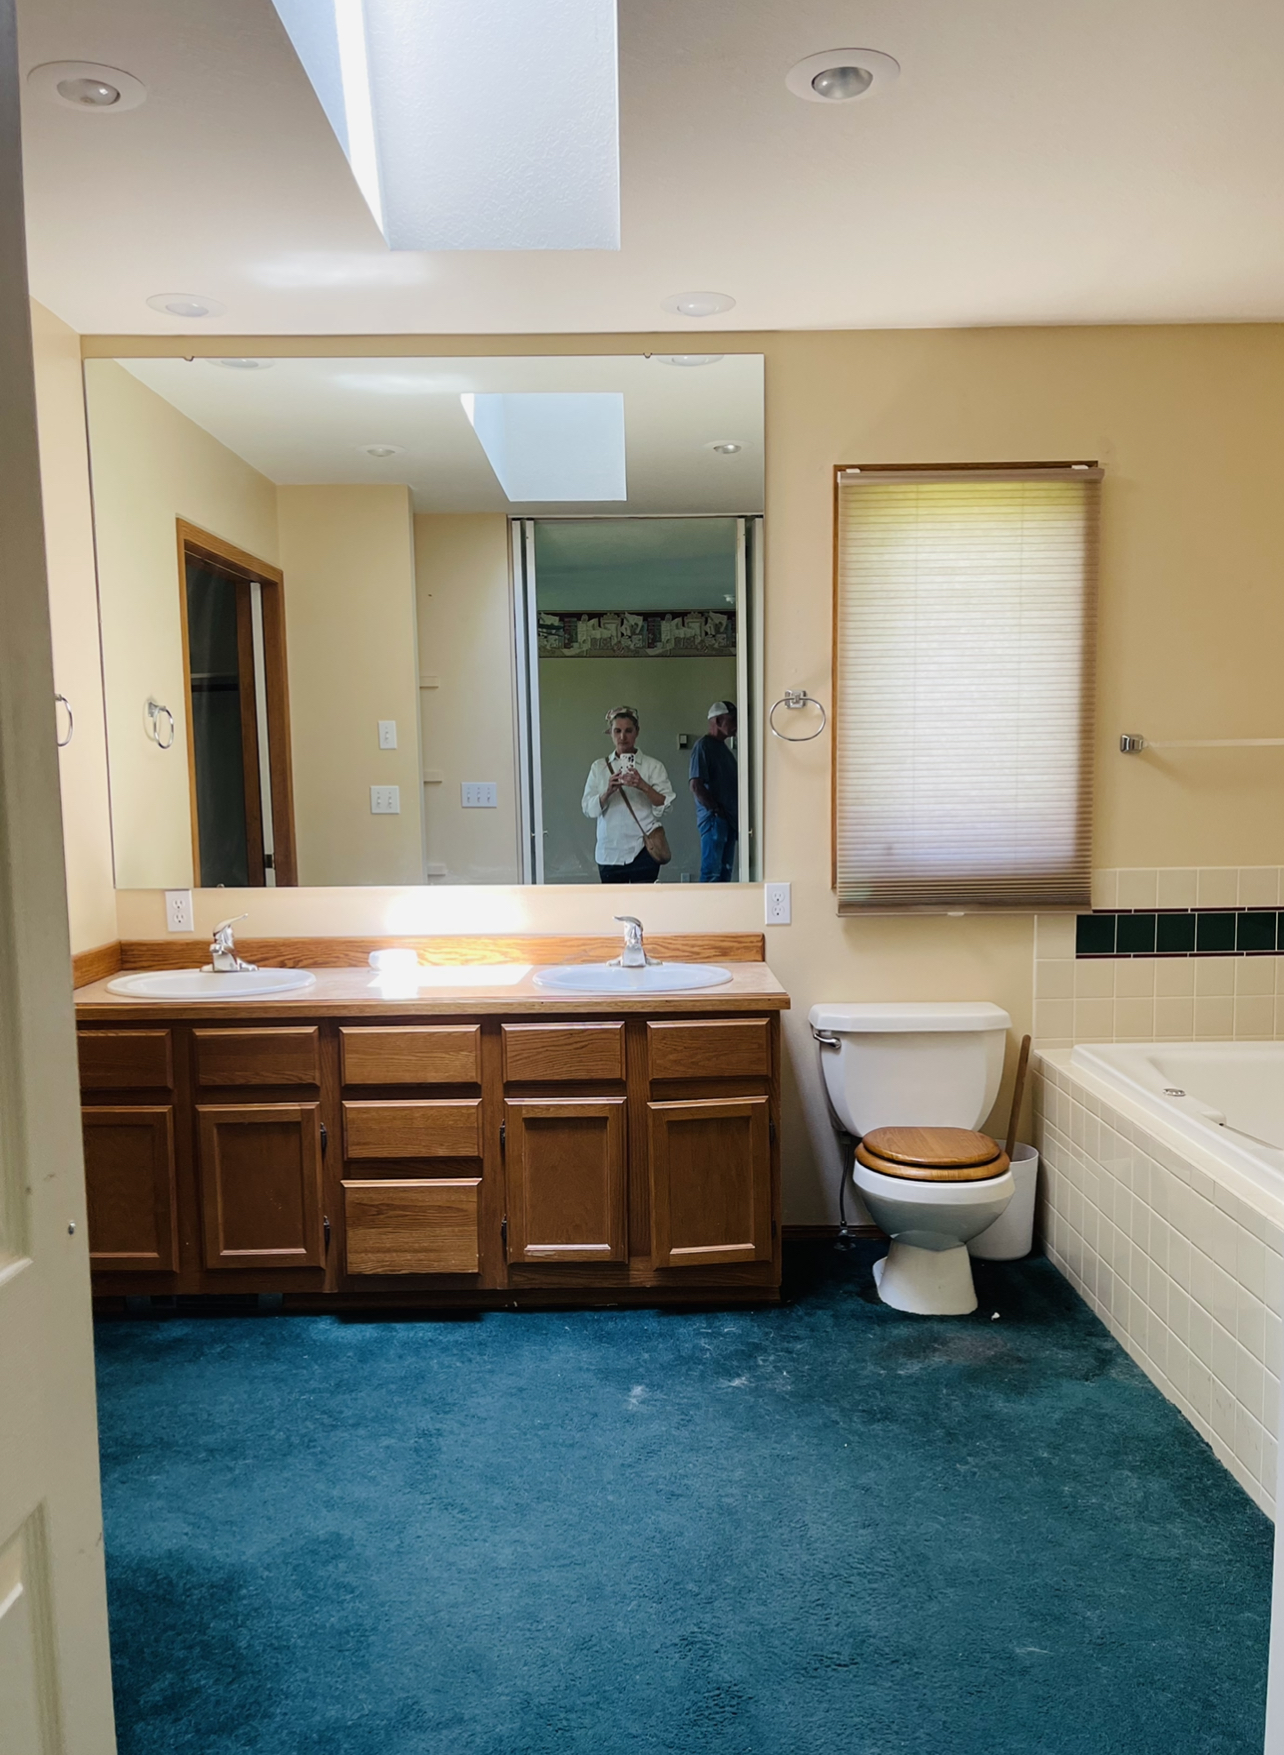
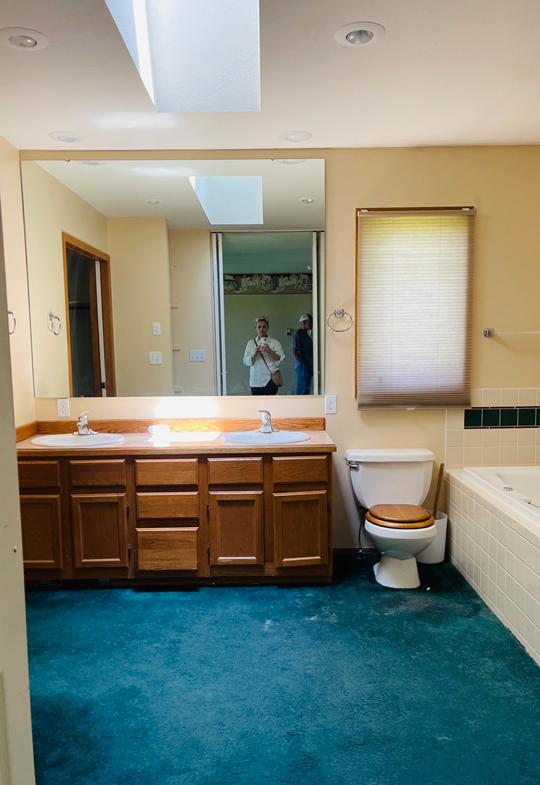
So here’s what we started with. Yes that is green carpet around the toilet and yes if you zoom in (which I don’t recommend) it is pretty um stained. Pulling up that carpet was the very first thing we did when we got the keys to the house!

A before/after of the same space! From this angle you can see how we moved the toilet to the right, removed the tub, added that wall for the shower + privacy (you’ll see that more detailed below), and also built that ledge behind the vanity. The ledge was actually a necessity but also one of my favorite things about this space! The original vanity had plumbing coming through the wall and our new vanity was more of a furniture piece so we had to close up the plumbing into the wall, and build out the wall a bit. We were going to just tile it all but I loved the idea of bringing in some of the white oak and I really like how the wooden ledge breaks up the wall and brings some organic warmth into the space.
Originally I wanted faucets that were mounted into the wall (so cool, right?). But ultimately with our timeline, it was SO hard to find vanities that were available! We had very limited options and ended up finding this one which was great although not my first choice.
FYI Product sources are all at the end of the post.

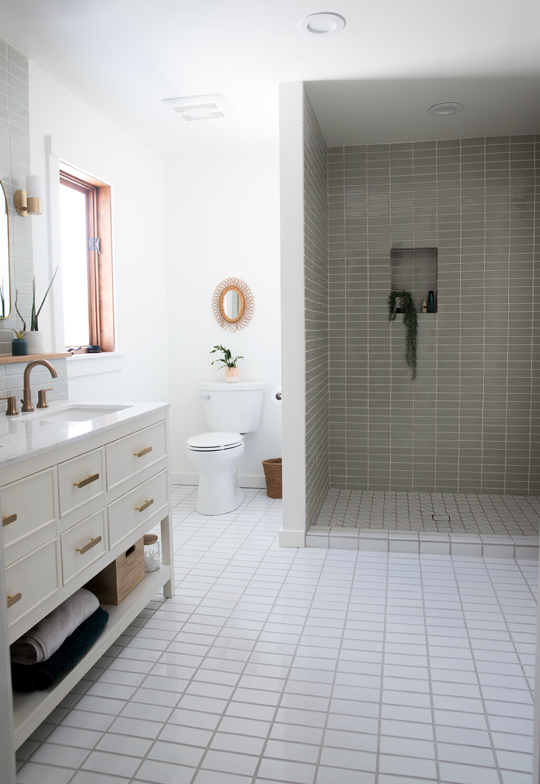
Another before/after of the other side. You can see a few major things we did here.
We removed the tub and moved the toilet to that corner for privacy with a wall. At first we played with the idea of keeping that area for a tub (maybe a clawfoot?) but thought it was crowded with a shower and tub, and we wanted to move the toilet into a more private spot.
So we got rid of the tub, moved the toilet, built a wall, and kept the shower plumbing where they originally were. And yes, still waiting on glass to finish the shower.

Here’s a process photo of after we had the tile installed and while they were working on the heated floors.
There’s no other heat in this room AND we live in Montana so heated floor in the bathroom felt like a necessity!
That coil is the heat that’s wrapped around the room on the orange grid which is part of the heated floor Schluter kit. The temperature is controlled by a device on the wall and you can schedule it to different temperatures for different times of the day. One tile setter warned is that under ceramic tile it could get too hot but it’s been perfect so far. SO nice!
Another process photo after the floor tile is all done and before the vanity/toilet/trim/mirrors etc were installed.


Tile Details
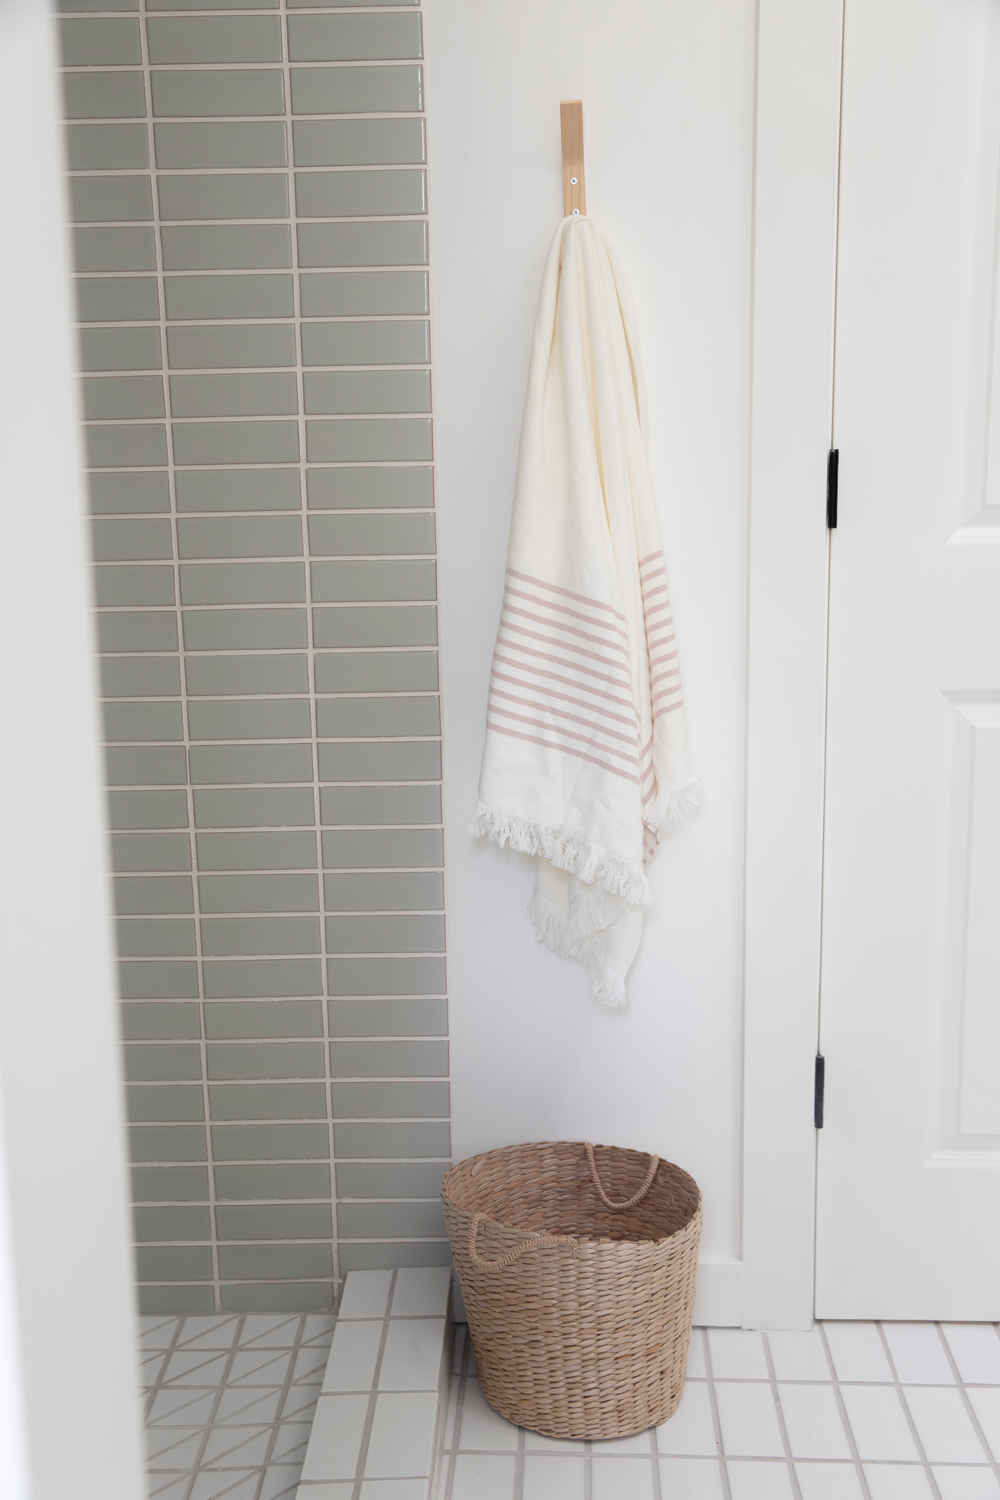
I really wanted a peaceful, spa-like primary bathroom. Little ledges to light candles, hang plants, calming colors, etc to really enjoy those small moments getting ready or winding down the day.
We partnered with Fireclay for this and all our tile projects, which was an absolute dream of a partnership. They walked me through the whole process, had great design advice, and really incredible customer service. Fireclay Tile is handmade in California using domestically-sourced materials. The factory uses 100% renewable electricity. You can find our more about their mission, process, and sustainability practices here.
For more inspiration check out their gallery section.
Our tile selections:
Wall tile: Fireclay Oyster Shell 2 x 6 .Grout is Avalanche White.
Floor tile (the same in all three bathrooms): Fireclay White Wash 3 x 6 . Grout is Warm Gray.
Shower pan: Fireclay White Wash 3″ Triangle Sheeted. Grout is Warm Gray.
The floor and wall tile is part of Fireclay’s Foundations line which is a much more affordable line. In comparison, these 2 x 6 tiles are $12/sq foot as opposed to the 2 x 8 which is $29/sq foot.
The Floor tile was also part of their Quick Ship line which means it gets shipped within 5 business days. Most other tiles is about 9-11 weeks of a lead time. The downstairs bathroom tile was also part of their Quick Ship line and made a huge difference in when we were able to move into the home.


Another view of the floor tile. All the tile we lay in our house were in a stacked design vs staggered. Staggered is more traditional and maybe long term might be more classic, but man I love the look of stacked til! Because this Fireclay tile is handmade, things don’t look perfectly lined up. Which our tile setters kept on warning us about. BUT I’m totally okay with that. Really love the look of handmade tile and that perfectly imperfect look.
Mixing Metals
We decided to mix metals for our fixtures/plumbing. This is obviously not always a popular choice, but I don’t love the idea of things being too matchy-matchy. In this case we mixed a brass (sconces + mirrors + hardware) with a champagne bronze (all plumbing fixtures and toilet paper holder/towel rack). What do you think?
Reminder: All other product sources at the very end of this post!


For the love of stacked tile!
You can see here that instead of schluter like we did for the girls shower nook, we ordered Fireclay’s Oyster Shell glazed trim pieces which have such a streamlined look.
Similar to traditional bullnose tile edges, but more sleek in my opinion.

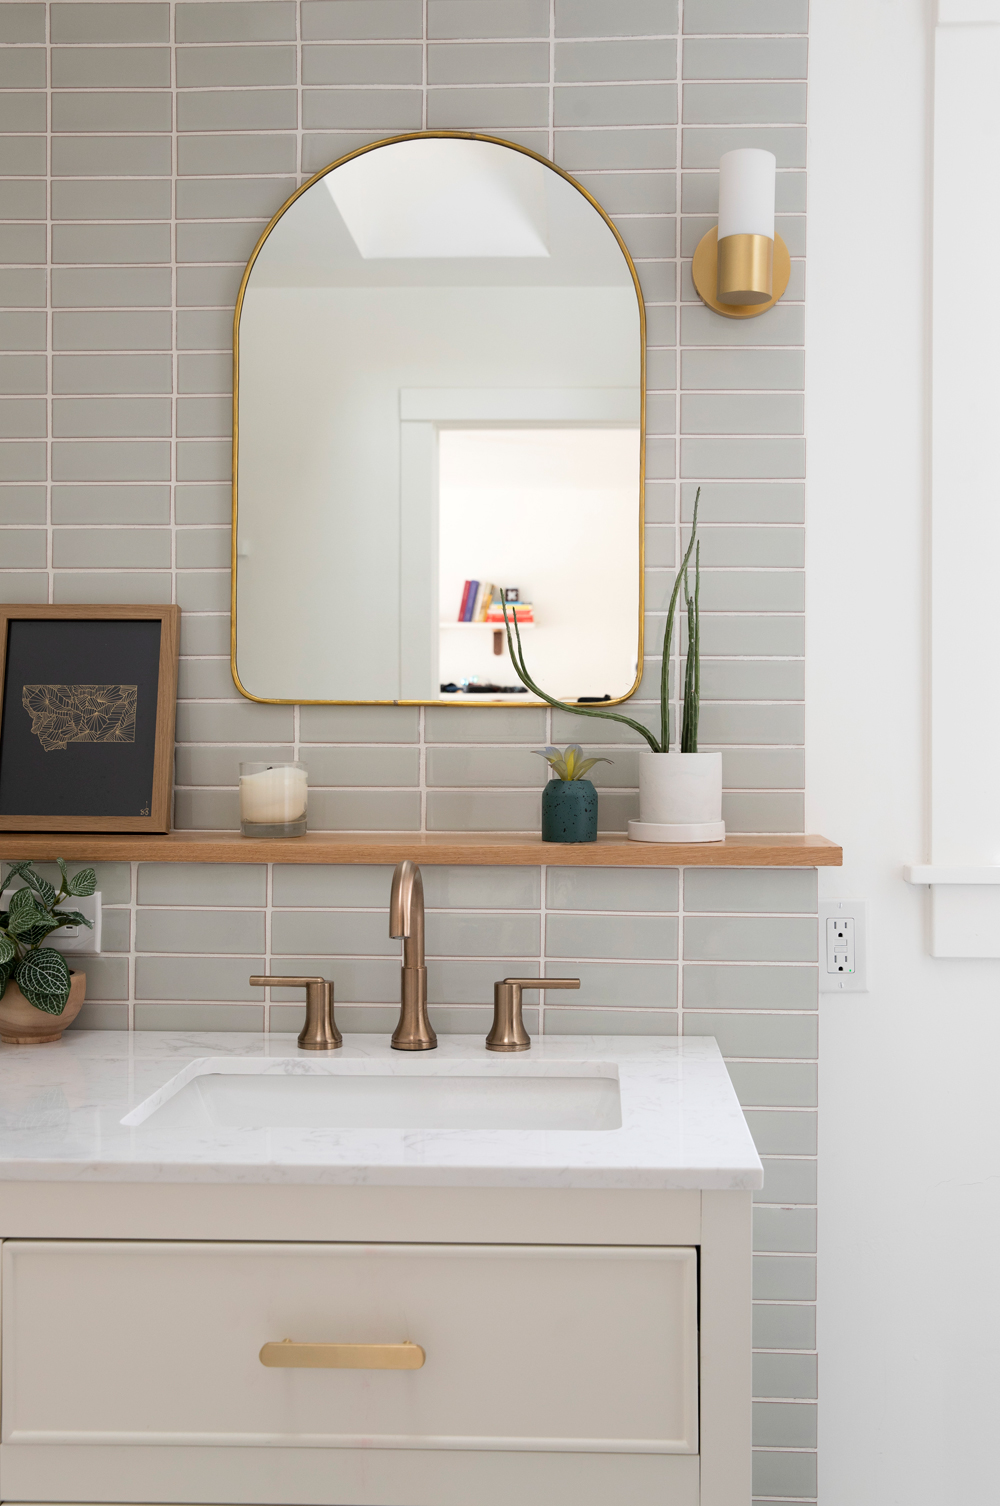
Gold mirrors from Etsy
Sconce lights are from All Modern
Faucet/shower plumbing from Delta (their Trinsic line).
I think the Delta Trinsic fixtures pair so well with Fireclay’s tile. The perfect balance between those yellow-y brass metals and bronze.

Also, here’s the left corner where we have some storage (this was original to the bathroom). These boxes and bins are all from Target with chalkboard marker labels because I cannot keep track after I organize things and I also need the option to change my mind later.
Really in love with how this turned out. Spa-like bathroom achieved!
If you missed the other three renovations I’ve shared, you find them here:
Let me know what questions you have about this project!